Dan Flavin, Andy Warhol, and now Michelangelo. Art Club quickly became one of the most exciting and flexible programs I offered at the library. Each session began with learning about an artist or art style, followed by a hands-on project inspired by their work.
This program was open to grades 1–12, as I mentioned in my previous post. Each project had to be accessible to younger kids, while still feeling meaningful for older participants. Library attendance is always unpredictable, so I always planned with flexibility in mind.
This Art Club session focused on Michelangelo and the incredible ceiling of the Sistine Chapel—and let me tell you, this one was unforgettable.
Introducing Michelangelo
To introduce Michelangelo, I shared pages from:
- Michelangelo by Mike Venezia
- Who Is Michelangelo by Kirsten Anderson (Who HQ series)
- 13 Artists Children Should Know by Angela Wenzel
They also watched a short YouTube video on him. Here’s a good one: https://www.youtube.com/watch?v=f-5BgQFxDao
Here’s a short, kid-friendly introduction you can use:
Michelangelo was an artist who lived over 500 years ago during a time called the Renaissance. He was a sculptor, painter, and architect. One of his most famous works is the ceiling of the Sistine Chapel in Italy. He painted it while lying on his back high above the ground, covering the ceiling with detailed images that tell stories. His work is known for showing movement, emotion, and the human body in incredible detail.
The kids were amazed by two things:
- The scale of the ceiling
- The fact that he painted it above his head
Which, of course, led directly into our project…
The Inspiration: Painting the Impossible
The Sistine Chapel ceiling is famous not just for how it looks—but for how it was created.
Michelangelo spent years painting overhead, working in an incredibly uncomfortable position to bring his vision to life.
So naturally, I thought:
Let’s try that.
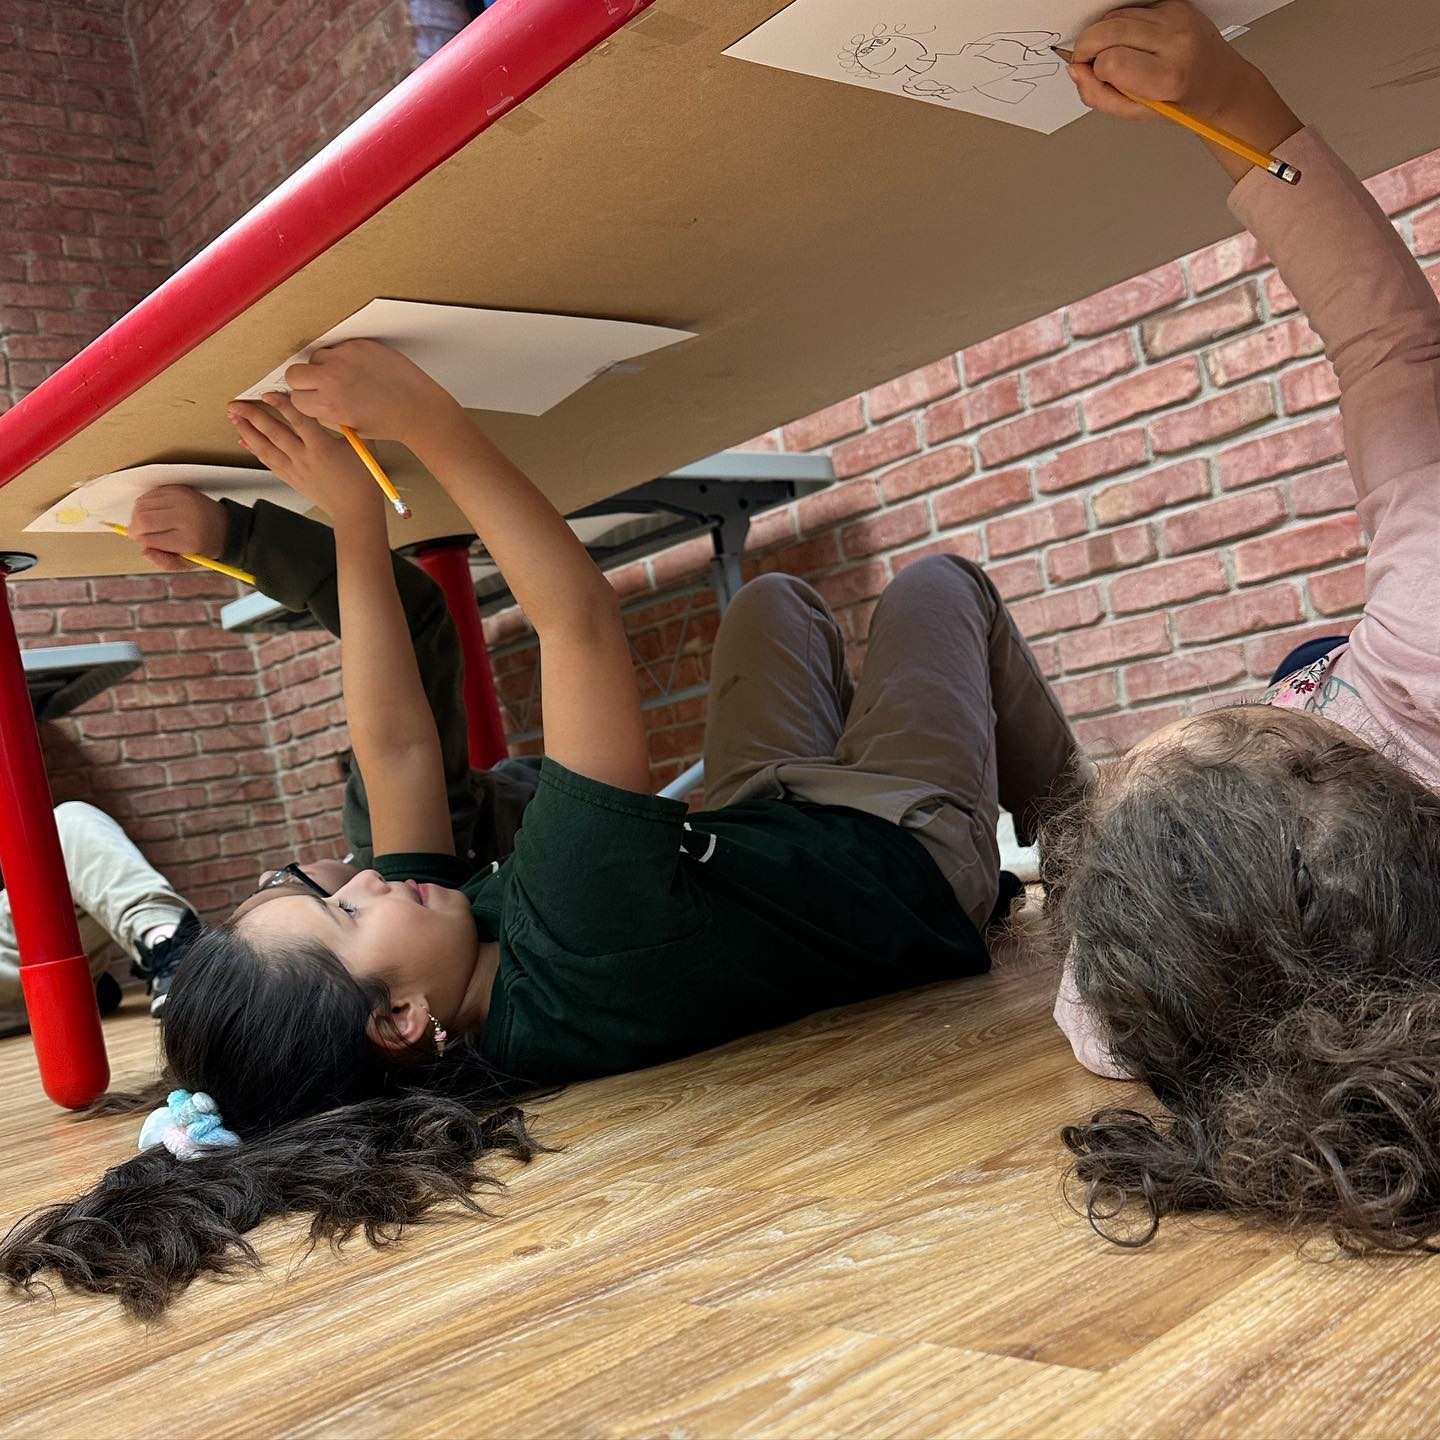
The Project: Under-the-Table Sistine Chapel Painting
This project flipped everything upside down—literally.
Instead of painting on a tabletop…
Kids painted underneath it.
Step 1: Set the Scene

Before we started, we watched the video. I showed images of the Sistine Chapel ceiling and pointed out:
- The large, detailed figures
- The storytelling through images
- The way the entire ceiling becomes one giant artwork
We talked about how Michelangelo had to think BIG—filling an entire space with art.
Step 2: Get Into Position
Here’s where things got fun. When they came into the room, the tables were all against the walls – not typical for Art Club. There were also no chairs. They sat on the floor for the introduction, then I instructed them to pick a table and look underneath.
- Each child had a piece of paper taped to the underside of the table
- They sat or laid underneath
- Then attempted to draw and paint above their heads
Immediate reactions included:
- “This is so hard!”
- “My arm is tired already!”
- “HOW did he do this?!”
Exactly the point.


Step 3: Create Their “Ceiling” Artwork
Kids were encouraged to:
- Draw people, scenes, or patterns
- Use markers, crayons, or paint
- Fill their entire “ceiling space”
Younger kids focused on simple shapes and drawings. Older kids (and a librarian!) leaned into storytelling and detail.
Step 4: Embrace the Chaos
This was not a neat project.
Arms got tired.
Lines got wobbly.
And the conversations I overheard were the best part!
The Gallery Moment
Once everything was finished (and everyone regained feeling in their arms), we carefully removed the artwork and displayed it.
And wow.
Each piece was completely unique—but all shared that same slightly wobbly look.
The kids were so proud—and more importantly, they understood the process in a whole new way.
Why This Program Worked
This project was successful because it combined:
- A physical challenge (painting overhead)
- A strong connection to art history
- Creative freedom
- A little bit of chaos (the good kind)
Younger kids loved the novelty of being under the table.
Older kids gained a real appreciation for the difficulty and skill behind Michelangelo’s work.
And everyone walked away saying:
“That was harder than it looks.”
Supply List
- White paper (standard or slightly thicker)
- Masking or painter’s tape
- Crayons, markers, or washable paint
- Paintbrushes (if using paint)
- Paper towels
- Printed images of the Sistine Chapel ceiling
- Slideshow or short video (optional)
Tips for Success
- Use tape that removes easily from tables
- Encourage kids to take breaks (those arms get tired fast!)
- Set expectations: it’s okay if it’s messy or imperfect
- Lean into the experience—this is about process over product
Final Thoughts
Michelangelo didn’t take the easy route—and this project made that very clear.
It gave kids a new appreciation for art, not just as something you see, but something you experience.
Art Club is at its best when it helps kids step into the shoes (or in this case, the very uncomfortable painting position) of real artists.
And this one? This one they’ll remember.
Probably every time their arm gets tired.
If you enjoyed this post and want to see others like it, check out these popular posts!
*This blog is intentionally ad-free. I want it to be a clean, distraction-free space. Here, public librarians can find practical ideas for youth services, outreach, and programming. There will be no pop-ups or sponsored clutter.
Some posts may include affiliate links for books or supplies I genuinely use and recommend. If you choose to purchase through those links, I may earn a small commission at no additional cost to you. It’s a simple way to support the work while getting materials for your own programs.
If you’ve found value in these ideas, please consider helping keep the blog running. Tips are always appreciated. They go directly toward hosting costs and content creation. You can do so here: https://www.paypal.com/ncp/payment/SPBXH4RPDHCCY
Leave a Reply